Background

Monday, November 8, 2010

I WANT SNOWFLAKES !!!


Hello friends, In the mist of rearranging my craft room,I happen to run across a half done card, A Christmas card at that. I started this one, sometime ago, one I started and decided I wasn't in the mood to finish or lost my train of "Thought". It's retired , a big block stamp , never used it before and after I stamped out a dozen or so of want-to-bes (cards), I stopped and started on something else. Well I decided to finish it. The stamp on one side  has a large snowflake, on the otherside a smaller snowflake.


I also started this card from the inside out!

Supplies I used:
Stazon White #106960 (comes with a refill)
Stazon Jet Black #101406
Winter Wishes Block stamp( retired)
Grateful Greeting #116511
Various Color of Cardstock
2-way Glue Pen #100425
Clear Embossing Powder #109130
*Embossing Buddy #103083
Dazzling Diamond Glitter #102023

Cut 8x11 cardstock in half to start 2 cards. Stamp using Stazon White, the large snowflake in the inside of card. Allow time to dry before handling.


Emboss the smaller snowflake on the outside of card.


Make sure that you use your "EMBOSSING BUDDY" to prevent static to paper. Thats those messy spots on cards when heated.


As you can see on the blue card the messy embossing powder. I didn't use my buddy. With Glue Pen, color in the snowflake on the outside of card. Apply Dazzling Diamond Glitter. Tap off, set aside to dry.


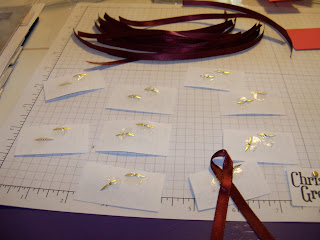
I punched out the dots for the "i's" in "Christmas Greeting", and used Gold Brads #104337 to highlight alittle...


Cut Real Red cardstock in Strips (2"), Bargain Ribbons 7" long. Take glue dots and place on brads, loop ribbon and attach to back of "Christmas Greeting".


Place on Real Red strips, trim. Use 3 Glue Dots per "Christmas Greeting", place glue dot in middle of ribbon where it crosses.


Trim to frame saying.
Use desired Glue to back and place on desired spot!


So the "Set aside" project that had no idea of whatever it was going to be, finally became "The SnowFlake Card". That's the way too GO! 
Never push a project if the Brain Cells Dies, it can be easily  pick-up at a different time with a "FRESHER" outlook than what you had before!
Until next time........
Harriet


Sunday, November 7, 2010

It's Time Now to "THINK" of "CHRISTMAS'.....


Hey Everybody, Seems like the days are blowing bye, and one of the best holiday of all is creeping up on us soon, very soon! And now with so many different christmas stamp sets that are out, It get really hard on which to decide, specailly if you bought more than 1, that it alone is a headache!. So just take a moment and breathe because its alright and "Who" said you had to do "ONLY 1 "a season!
This will be the first "Christmas Card" out of several that I'll be doing, So I hope you stick around.
Messing around with my "New" Big Shot folder -" TEXTURED IMPRESSIONS" NORTHERN FURRY.I guess I wanted to highlight the impression itself - The Snow Flakes. And this is what I can up with. And to tell you the truth, I'm really not happy with the out come of the card! I think its o.k. not to like your own stuff, cause I really believe that leaves room for a diiferent approach next time. And also with this card it became an "ADD" to it card. Every time I would get done with a step, it just needed something else.I really didn't know what but it did need more...

Riding Hood Red #111348
Rose Red #102544
Bravo Burgundy # 105723
Whisper White #100730
Garden Green # 102584
Christmas Postcard Stamp #121428
Stazon Jet Balck #101406(refill #102566)


Here is some of the materials I used. Forgot to put the GARDEN GREEN CARDSTOCK in picture:)
 I placed cardstock in folder, and put it thru the Big Shot. Roll to the back, and the back to the front (toward you) this will impress the pattern better.


Even looking like this, they came out looking nice.. But I really wasn't happy with the looks, I decided to take a step-up and lightly use stazon WHITE over the 3-D image.


So now its done and it looks funny and I feel like I just wasted my TIME and PAPER. Let's cover most of the card and leave alittle of the snowflakes.


Will use colored pencils on image. I have stamp'in Up colored pencils and they have retired the set. the other colored pencils I use all of the time - CRAYOLA. The best time to buy these colored pencils are when "Going Back to School" sales starts...

Used my dauber to go around the edges Used Garden Green . Next Designer Paper and Cardstock.


O.K -  Next: The green cardstock - Garden Green......


Used Whisper White And Garden Green to layer and frame out my card cover.


Added foam tape to give height image up on card.

Now to Color image.

Used Stamp in up color pencils (retired).

And the finally step was I added Dazzling Diamonds Glitter #102023 to the belles.
I also used tissue to smear the stazon. I guess the project over all turn out looking good, but like I said this was one of those cards that no matter what I did , I just wasn't satified no matter how I looked at it. Did you EVER have a card that was like this one. Would love to hear your story.....
Until next time - Happy Stamp' In !


Sunday, October 17, 2010

Wooden Greeting Cards


I've been saving the odd pieces of cedar that was left over from a make over project that we did in my kitchen this summer.Besides the wonderful smell it looks beautiful, I went over it with tongue oil and it turned out nice. Well Thinking and thinking about what I was going to do with them . The cedar planks fit into a legal size envelope- 4 1/8" x 9 1/2" . So for "SOMETHING DIFFERENT" again, I decided to stamp on the pieces.


The cedar pieces were damp, I did let them dry before stamping.

You can actually tell wet from dry.

After drying, figure out where to stamp at. It can be a full stamp to one single image.


Also used STAZON because it won't smear or run if wood is damp.

Color, let set then use a light coat of clear spray paint. Then the hardest thing will be deciding who will get one! Thought it was pretty cool, and the people I shared them with just "Loved Them"..
I hope everyone enjoyed this odd project. I also want to add is: I drilled holes in corners to make a wall hanging out of them too.
I'm waiting for my new stamps to come in, so I possibly can start Christmas Cards! And that's just right around the corner.... Until next time... Use your creative skills and "CREATE"
Harriet


Saturday, October 9, 2010

Something "DIFFERENT" in the Air...


                                                             Hello Everyone ,
It's been  too long since I've said anything. OMG, That's keeping my mouth shut,and golden in these times. Not to long ago we got back from Mackinac Island, which is located in my home state of Michigan. Yes, a real Island . Really Beautiful and will take you back in time for sure! Only Bikes and Horses are aloud there.Stayed in a "Historical House" 140 yrs. old. Just truely charming. (I always wondered what the word really meant, and now I do).
Using Imagination, Nature and Fall Colors, I played around with "WHITE BIRCH BARK", and found out it was workable when slightly damp. So Check it out, What do "YOU" think?


I also used a cheap clear spray paint to help preserve the bark as well as the design too! I used Stazon instead of just plain black ink. This was to stop it from running, when I sprayed the picture..
I kepted the bark damp, by keeping it in a ziploc bag, and gentlly bending and twisting to change the shape of the bark. Pressed it out by using heavy books.
These cards will be Thanksgiving Day Card. Until next time Happy stampin...

Wednesday, September 1, 2010

It's September !

Hello my Crafty Friends;

                     HAPPY SEPTEMBER 1 - TO YOU ALL!

There are so many, many goodies inside this little catalog, that your Favorite ones will be almost the whole catalog!
Some of my Favorites are :
Spider Web Embossing Folder
Deck the Halls Designer Paper
Days of Gratitude
Bells & Boughs
Waffle Paper
Nite Owl Designer Paper

Ok everything in this mini is Oh Oh, so fabulous I could list every item But that would take forever.
If you are interested in a catalog or have one and would like to order, please feel free to contact me : ladymcnibble@sbcglobal.net. I would love to talk to you. Until next time :) Inspiring People never "BRAG" they just "CREATE".
Harriet :)

Tuesday, August 31, 2010

Jumbo Wheel Card "Haunting Hill"


Hello Crafters, Here's a card made with a "Jumbo Wheel". Gives the card a flowing look. The cardstock I used was cardstock from the craft store ( you know the stuff friends and family buy for you on birthdays and holidays). A very simple card, I pulled out the moon and added a bat to give it a highlighted look. I also did various  cards with this one. Soooooo let's get started..


Materials used. Odd cardstock : orange, yellow, tan, purple. SU cardstock Whisper White #100730, Basic Black #121045, More Mustard #100946, Bat Punch #119279, 3/4" circle punch #119873,
Glue stick #104045, jumbo wheel handle #103661, basic black jumbo ink cartridge #104582. I used a Stamp Set that is "RETIRED" Autumn Apparitions- sorry don't have an item number for this set.

Wheel it out. I used Whisper White (100730).


Measure by holding cut-out strip to card.


Mark, then cut. this helps out by stopping too short of strip. Now at this point color in design.


Cut orange cardstock into strips. Glue to BACK of design.


Punch Bats and Moons out..


Glue Moon and Bat.

Will look like this when finished. Can trim any extra off design.

Stamp out words. I used craft scissors and glittered the word for the inside of card. Decided to use grey brads that I had, to give it a plank look.
Used Glue Dots (medium) to apply front of card and inside of card.
inside looks like this. And at the last minute I used large TAG punch (119876).

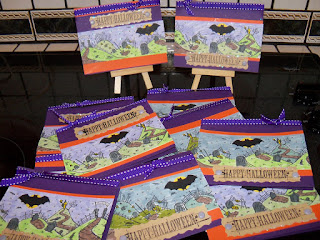
And the Finished Cards..

I did end up changing marker colors to find the right colors. I hope that I show you that you don't have to have stamps to make a card. And as you can see, don't forget to trim any extra hang overs on card. Open card and turnover to trim... Until next time, Be Adventurage and "Just Create"!
Harriet