Background

Sunday, August 28, 2016

Hello there everyone! It's almost that time of the year again "HALLOWEEN", it's one of my favorite holidays. You can be what ever you want, rather if it's alive or dead.

This is a retired Stampin Up stamp set called " Wicked Cool", and I think it's cool.

I have used it for October birthdays as well as a Halloween card. It's made with scrap paper that I seem to have a ton of. My bad habit, I'm afraid of throwing everything and anything away, I sometimes can find some kind of use for it. I also used an Embossing folder which is a retired Stampin Up product.
The inside was cut out with my cricket. I don't use it too much anymore because I do need new blades for cutting. And again all paper is scrap or pre-made things that I have previous made stuff that I made too much of.
All extra should never be thrown away, it really does come in handy, you never know when something comes up. Been there, done that kind of thing.
This is going to be short post today, I'm currently working on another Halloween card that will be posted shortly. I hope you will use left over paper, because you just never know! And until next time, Be Happy, Be Creative... Until next time, Happy card making! Harriet  


Thursday, April 14, 2016


A CARD IN A BOX
Hello my fellow crafters, I thought I'd start with this cool "Card in a Box". These two cards are for my Granddaughter and Grandson, who's birthdays are right around the corner. If you think this card is hard, it's really not, so let's give it a try.

The stamp set I'll be using is "Party Pants ( Sale-A-Bration)

My punches

Chocolate chip cardstock #102128
Calypso Coral #122925
StazOn Black Ink #101406
Party Punch Pack #140608
Daffodil Delight Ink #126944
Tempting Turquoise Ink #126952


Now the "GREEN GLITTER PAPER" and the "FISHIES" are from Micheal's and found
in a clearance section..

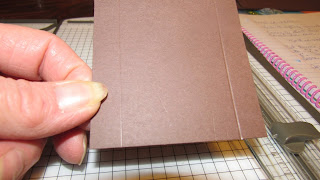
It's going to be a 5"x8 1/2" piece of cardstock. Now we're going to score at 2", 4", 6" and 8".


 Then turn long ways and score at 3", it should look like this.


Now we need to cut a 3"x3" piece for the inside. This small piece is going to be for balloons or anything else that you might want to use for this card.
once cut , score 2 sides at 1/2"


                                           It should look like this..
Fold at scored marks (ends)


With your base cardstock, cut and remove the short piece , 1/2" short end
Now before you cut "ANYTHING", make sure you have cut the skinny end piece, and it will look like this. the base of the card is done and ready

                                                      To fold, fold going one direction, 

 
I usually lay flat card and glue in place.


                                        Now let's work on the outside with designer paper.
                we need to cut; 7 @ 1 3/4"x1 3/4",  1@ 1 3/4"x 4 3/4", 3@ 1 3/4"x2 3/4",

Now we can start assemble your card. Base of card.


Fold only 3 sides the 4th side will be the backside of side.


 apply glue to scored and bent 3"x 3", this will be inserted to inside of box.

                                                                 Center and then again lay flat and fold with center inside this with adjust the center and give that a perfect fit, and if any adjust is needed then you can do that now.
Set designer paper in place, remember the cut 4 3/4" cut designer paper will be the backside of box                                                                   

Now decorate.


                                                     All of the punches I used. At this time doing the card
                                                      I didn't have the double Balloon punch ( #140609)

Used Window Sheets (#114323) for the balloons and cake time. make sure your glue dots don't flab over or everything will stick together.
I hand cut out Balloons. No punch at the time.


The number 13th is for my Grandson Randy and 15th is for my Granddaughter Christina


I hope you will try this really cool "Card in a Box" Card.
Until next time, Happy Creating!
Harriet


Friday, January 23, 2015

ToolBelt Card


Well here we are again, another year that past by so quickly. And with all of the New Year's promises that we make to ourselves, regardless of what they are, just how many are we going to try to keep? For me, besides the same old ones like, weight loss, to be kinder to our fellowman, to visit relatives more often....  I think mine's going to be: put more creativity in my life. I'm going to start with a birthday card for my son, which is in February. He's into Heating & Cooling, so I thought I would try my hand at making a "ToolBelt" card.
All materials I used in making this card, came from my scrap box of odds and ends. Mustard colored cardstock, and Navy Blue cardstock was from Halloween Cards. Burgundy to highlight greeting on the front of cards.


Used 1" punch for buttons. Punch out, decorate, glue to a  fitted piece of paper. This will represent the buckle. 
 
 
 I stamped out tools on Ivory cardstock, Colored and cutout tools .
 
Used tape measure for pockets.
 
                                                   Now to assemble the card.

                                                  
     To cut out hole for saw, used small slot punch. To round corners out, used the corner punch.

 
                                                       and again cut quarter in half then stamp.

                                    
                                        Used gold Christmas ribbon, in which later had to use different ribbon just because I ran out. Glue in place.

 Folder in thirds by simple folding over, press with fingers.


Punch small hole in Tape Measure paper ONLY. Cut ribbon long enough to fold over to hold Hammer. I ended up changing brads. Smaller ones work better.


I wanted to show you the bulkiness that left the card too stressed out!

                         Here's the mistake of punching the brad hole. No excuse, except I wasn't paying attention.


 I ended up doing 12 cards. Not a good card for mass productions. The pain in the butt of this card would be the cutting of the tools. I didn't have a problem in doing this.


I also stamped the front of the envelopes.

                                                    The end results...
This a very challenging  project. If too much, don't scrap it, set it aside or keep for a rainy day project. This would also work as a Gardening Belt. Hey, there we go now... Maybe my next project! I hope you'll give it a try. Until next time. Happy Card making!!!!!